Fostering To Adopt: How Temporary Homes Create Forever Families
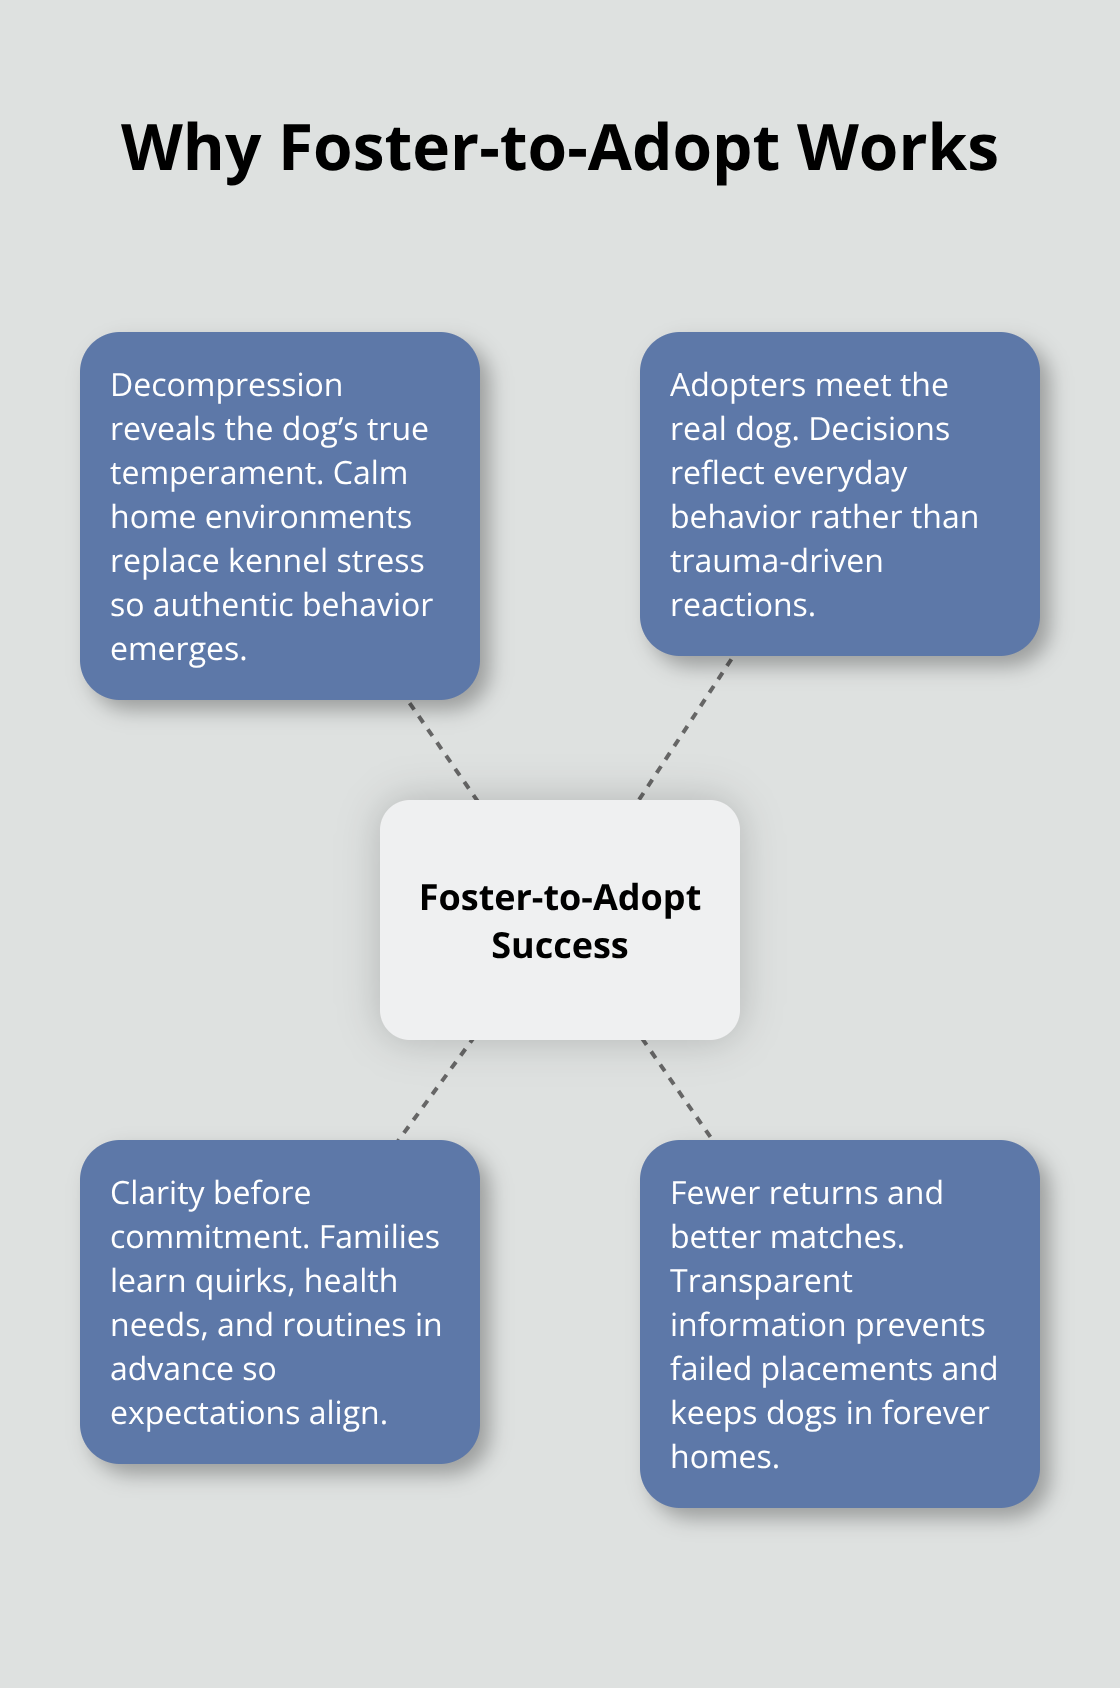
Foster-to-adopt programs transform the way dogs find their forever homes. By spending time in a temporary home first, dogs get the chance to relax, show who they really are, and build trust with their potential family.We at DogingtonPost believe this approach works because it benefits everyone involved. The dog gets a second chance to thrive, families make better matches, and shelters free up space for more animals in need.Why Foster-to-Adopt Actually WorksFoster-to-adopt programs succeed because they strip away the shelter environments noise and stress. A dog living in a kennel shows only fragments of their personality-fear, confusion, or defensive behavior mask who they truly are. In a foster home, a dog decompresses over weeks or months, and their real temperament emerges. This matters because adopters see the actual dog theyre getting, not a traumatized version wearing a mask. Foster families know exactly what behavioral quirks, health needs, and personality traits theyre committing to before signing adoption papers. This clarity eliminates the guesswork that leads to returns and failed placements.The Decompression Effect Changes EverythingA dog fresh from a shelter or rescue needs time to regulate their nervous system. The first two to four weeks in a foster home are critical-dogs stop reacting to constant noise and overcrowding, sleep patterns normalize, and anxiety drops noticeably. Foster parents witness this transformation firsthand. They see a fearful dog become playful, or a hyperactive dog settle into a calm routine. This decompression period also reveals medical or behavioral issues that shelter staff might miss. A foster parent spends daily time with a dog and catches subtle signs like limping, digestive problems, or resource guarding that require attention before adoption. These discoveries prevent adopters from inheriting expensive surprises or behavioral challenges theyre unprepared for.Strong Bonds Form Before Adoption DayFoster families dont just observe dogs-they build genuine relationships. Feeding a dog daily, taking them for walks, playing in the backyard, and sleeping under the same roof creates attachment that matters. When a foster family decides to adopt permanently, theyre not meeting a stranger; theyre formalizing a bond that already exists. Fostered dogs form secure attachments to their caregivers, which accelerates adjustment in the new home because the dog already knows their adopters voice, routine, and expectations. Families who foster-to-adopt report higher satisfaction because theyve eliminated the unpredictable adjustment period that typically follows adoption. The dog settles faster, behavioral problems are fewer, and the family feels more confident in their decision. This proven model reduces adoption returns significantly compared to direct shelter adoptions, which means fewer dogs cycle back into rescue systems and more permanent placements stick.What Foster Parents Discover About Their DogsFoster parents uncover information that transforms adoption outcomes. A dogs true personality emerges in a home environment, revealing whether theyre social butterflies or introverts, high-energy athletes or couch potatoes. Foster parents also identify specific needs-a dog might require medication for anxiety, need extra time with other pets, or thrive best as an only dog. This detailed knowledge allows adopters to make informed decisions and prepare their homes appropriately. Rescue organizations rely on foster feedback to match dogs with the right families, not just any family willing to adopt. When adopters understand a dogs actual needs before commitment, theyre far more likely to succeed long-term.The Ripple Effect on Shelter CapacityFoster-to-adopt placements free up shelter resources in ways that direct adoptions cannot. Each dog that moves from foster care to permanent adoption opens a kennel space for another animal in crisis. Shelters operate at capacity constantly, and foster programs act as overflow systems that allow rescues to save more dogs. Foster families essentially become extension workers for rescue organizations, providing care that would otherwise consume shelter budgets and staff time. This efficiency means more dogs get second chances instead of facing euthanasia or prolonged confinement.Real stories from foster families reveal just how transformative this process becomes-and what happens when a temporary home becomes forever.Getting Ready to Foster and What Happens NextRescue organizations structure foster programs with clear expectations and support systems, though the specifics vary by organization. Most rescues require foster parents to complete orientation training covering basic dog behavior, handling techniques, and health monitoring before a dog arrives. This training typically takes two to four hours and covers recognizing stress signals, managing resource guarding, and identifying medical red flags. Foster parents receive written guides specific to each dog, including dietary needs, medication schedules, behavioral quirks, and emergency contact information. The best rescue organizations assign a dedicated caseworker or foster coordinator who remains available throughout the placement, answering questions and troubleshooting problems in real time. This support matters because foster parents arent veterinarians or behaviorists-theyre temporary caregivers who need guidance when a dog shows unexpected behaviors or health issues. Before committing to foster care, ask potential rescue organizations how they train foster parents, what written materials they provide, and how quickly they respond to urgent questions.Daily Care Responsibilities That MatterDaily foster care involves consistent routines, careful observation, and detailed record-keeping that directly impacts adoption success. Foster parents feed the dog at regular times, monitor appetite and digestion, track bathroom habits, note any limping or signs of discomfort, and observe how the dog interacts with other pets and visitors. This daily documentation becomes invaluable information for adopters and rescue staff. Foster parents should record behavioral changes, medication effectiveness, sleep patterns, and social preferences in a simple log or notebook-many rescues provide templates for this. Health monitoring is non-negotiable; foster parents must recognize signs of illness like lethargy, vomiting, diarrhea, or excessive scratching and report these immediately to the rescue.The Critical First Weeks Reveal EverythingThe critical first weeks reveal the most critical information about a dogs true temperament and medical status. Foster parents who maintain consistent schedules-regular walk times, feeding times, play sessions-help dogs regulate their nervous systems faster and show their authentic personalities sooner. A dog that arrives anxious and withdrawn often transforms into a playful, confident companion once the decompression period takes hold. This window of time allows foster parents to identify whether a dog needs medication for anxiety, requires extra socialization with other pets, or thrives best as an only dog. The observations foster parents make during these weeks directly shape which families receive matches and how well those matches succeed long-term.Transitioning to Permanent AdoptionThe shift from foster care to permanent adoption happens gradually if the foster family adopts. Foster parents work with the rescue to finalize paperwork, arrange a veterinary checkup if needed, and update microchip information. If a different family adopts the dog, foster parents should prepare the dog for the change through consistent messaging and maintain open communication with the new adopters about the dogs preferences and routines. This handoff period typically takes one to two weeks and involves the foster family introducing the new adopters to the dog, sharing detailed notes about what works, and discussing any behavioral strategies that proved effective during foster care. The foster parents role shifts from caregiver to mentor, ensuring the dogs transition remains smooth and the new family feels confident in their adoption decision.What Foster Dogs Actually Teach Us About Adoption SuccessFoster-to-Adopt Placements Succeed at Higher RatesFoster-to-adopt placements succeed at dramatically higher rates than traditional shelter adoptions. Foster families commit to dogs they already know intimately, reducing the shock of behavioral changes or unmet expectations. The dogs themselves benefit too-they arrive in their permanent homes already decompressed, already bonded to their adopters, and already confident in daily routines.Foster parents spend weeks observing a dogs true personality, and that observation becomes the foundation for successful matches. A foster parent might notice that a dog resource guards with food, needs anxiety medication, or requires an only-pet household. These discoveries prevent adopters from inheriting problems theyre unprepared to handle. When adopters receive detailed foster reports showing exactly what theyre getting, they make informed decisions and follow through with commitment. The foster period essentially screens out mismatches before they happen, which is why dogs from foster care stay in their forever homes.What Foster Parents Discover During Temporary CareFoster parents uncover details during temporary care that directly shape adoption outcomes in measurable ways. A dog showing excessive barking in a shelter might simply experience stress, but a foster parent learns over four weeks whether the barking persists in a quiet home or stops completely once decompression happens. A dog that appears shy in a kennel might reveal itself as highly social once it trusts a caregiver.Foster parents identify medical needs too-skin allergies, arthritis, ear infections, or behavioral anxiety that shelter staff missed during brief evaluations. This detailed knowledge gets documented and shared with adopters, who then prepare appropriate care plans before the dog arrives permanently. Foster families also build confidence in dogs through consistent routines and safe spaces during foster care.How Confidence Transfers to Permanent HomesA fearful dog that learns to trust one person in a foster home transfers that trust more easily to an adoptive family because the foundation already exists. The foster period acts as a confidence-building bridge that accelerates adjustment in the permanent home. Rescue organizations that invest in foster programs report higher adopter satisfaction scores and lower behavioral complaints post-adoption because families understand exactly what theyre committing to and dogs arrive psychologically ready for their new environment.Final ThoughtsFoster-to-adopt programs create permanence where traditional adoptions often fail. Dogs that spend weeks decompressing in foster homes arrive in their permanent families already bonded, already confident, and already understood. Adopters who foster to adopt eliminate the guesswork that leads to returns and heartbreak.One foster home creates ripples far beyond a single dogs life. When a foster family commits to temporary care, they free up shelter kennel space for another animal in crisis. Rescue organizations operating at capacity depend on foster networks to save more dogs, and each transition from foster care to permanent adoption opens resources for the next animal waiting for rescue.If youre ready to make a difference, contact a local rescue organization and ask about their foster program structure, training requirements, and support systems. Most rescues welcome foster parents and provide everything you need to succeed. Visit DogingtonPost for expert advice and real stories from families whove transformed their lives through fostering to adopt.